



Part 2 of our VHS-to-digital guide. Deciding between DIY and a transfer service? Start with Part 1: How to Convert VHS to Digital Without Owning a VCR.
To convert VHS tapes to digital at home, you need a working VHS player, an analogue video capture device, the correct connecting cables and somewhere to save the recordings. A computer is required for a USB capture adapter; a standalone recorder can save to a compatible USB flash drive instead.
The easiest shopping mistake is buying the converter and discovering that you still cannot play the tape. This guide puts the whole setup together, explains what each piece does and helps you choose one route before you spend anything.
This article contains Amazon.com affiliate links. As an Amazon Associate we earn from qualifying purchases. You do not pay extra for using these links.
These are researched equipment options, not a claim that we have personally tested every product or seller. Check the exact model, current manufacturer requirements and seller's included accessories before ordering. Amazon.com prices, shipping and import charges can differ for Canadian buyers.
Choose your VHS-to-digital setup
Start with the equipment you already own. A compatible, reliable player you can borrow may remove the biggest purchase from your list.
| What you want to do | Choose this route | What the complete setup needs |
|---|---|---|
| Record without using a computer during capture | Standalone recorder | Working VHS player, ClearClick Video to Digital Converter 2.0, its supplied connection and power cables, compatible USB flash drive or SD card |
| Capture and manage the files on a computer | USB capture adapter | Working VHS player, Elgato Video Capture, connection cable, compatible Mac or Windows computer with available storage |
| Keep a separate copy after capture | Backup storage | A separate drive, such as WD Elements, connected to your computer; an additional copy stored elsewhere is sensible too |
Choose one capture route. You do not need both the ClearClick and the Elgato. A backup drive has a different job from either capture device.
Before buying a complete setup, compare the other option. Ask Porthos about transferring your tapes, especially if you have only a small collection and no working player.
1. A working VHS player comes first
The player reads the tape. Everything after it depends on the picture and sound it can produce.
If you need to buy one, the Sony SLV-N750 renewed VCR listing is one option to investigate. Treat it as a starting point for checking the particular unit and seller, rather than a guarantee that any machine bearing that model number is ready for your family archive.
Before buying a used or renewed VCR, ask:
- Has playback been tested with both picture and sound, rather than just checking that it powers on?
- Does the machine support the recording system and tape speeds used for your tapes?
- Are the required audio/video outputs working?
- Is the remote included, and can you access the controls you need without it?
- What happens if it does not play your tapes properly? Check return terms and return shipping before purchase.
Photographs of the actual unit, its rear connections and its model label are more useful than a stock image alone. A vague “untested” listing is a poor place to start if these are your only copies of important memories.
For tapes recorded outside Canada, tell the seller where they were recorded and ask about playback compatibility. A capture device accepting several television standards does not make a VCR play every recording standard.
2. Elgato Video Capture: the computer route
The Elgato Video Capture USB adapter is an option if you want to capture on a compatible Mac or Windows computer. It connects an analogue source to the computer and uses capture software to create the video file.
Elgato documents composite RCA and S-Video inputs, supplies a composite video/stereo audio cable, and lists downloadable software for Mac and Windows. A VCR is separate. Before ordering, compare your computer's operating system and available ports with Elgato's current requirements and downloads.
Connection path: VHS player → analogue capture adapter → computer → separate backup.
This route suits someone who wants to name, review and organize recordings on the same computer used for capture. It also means the computer needs to remain available for the transfer: plan disk space, power and time before starting a long tape.
If your computer only has USB-C ports, resolve the physical connection and software compatibility before buying. Do not assume every cable or hub you already own supports the connection you need.
Elgato lists standard-definition output resolutions of 640 × 480 for 4:3 and 640 × 360 for 16:9. This is a convenience-oriented capture option, not a promise of lossless archival capture or newly recovered HD detail.
3. ClearClick Video to Digital Converter 2.0: the standalone route
The ClearClick Video to Digital Converter 2.0 is an option if you would rather record without a computer connected during capture. You still supply the working player.
Its manual describes recording to a USB flash drive or SD card, using the supplied AV cable and power adapter. Storage is included only with certain bundles. Its HDMI socket is an output, not an input. Check the ClearClick 2.0 manual against the exact version you order.
Connection path: VHS player → standalone recorder → compatible recording storage → backup copies.
This separates the recording task from computer work. You can move on to organizing and backing up the files after capture, but “no computer required for recording” should not become “leave the only copy on a small USB stick forever.”
Do not buy this expecting it to pull a digital file straight off a cassette at high speed. The source tape still needs to play through while it is recorded.
4. Recording storage and backup storage are different
A USB flash drive for the standalone recorder
The SanDisk Ultra 32GB USB 3.0 flash drive matches the brand, interface and capacity range recommended in ClearClick's 2.0 manual: a new SanDisk USB 3.0 drive of 512GB or less. That is a specification match, not a claim that we have tested this particular combination.
Check the recorder's formatting instructions before use. Formatting can erase existing files, so use an empty drive and make sure you have selected the right one. A capacity figure alone does not tell you precisely how many tapes will fit; recording settings and running times affect file size.
A separate drive for finished files
For an independent copy of the videos on your computer, the WD Elements 2TB portable external hard drive is one storage option. Check its connection and formatting requirements for your computer.
Use this as computer-connected backup storage. It is not a substitute for the capture device, and this guide does not recommend plugging it into the ClearClick as a recording destination.
Copying a finished recording to another folder on the same disk is not an independent backup. Keep separate copies, open them to check playback and store one copy away from the main collection where practical. Retain the original tapes while you check the results.
5. Check the cables before buying extras
Have a mixture of tapes and no idea which player they need? Send us an enquiry with the formats you can identify. We can help you work out the next step before you buy equipment or send originals.
For the composite connection described here, yellow carries video, while red and white carry the audio channels. Follow the labels on the equipment: the player's OUT connects to the capture device's IN.
The standard kits above include connection cables according to their manufacturer documentation. Check the actual bundle or used listing before ordering a second set. Missing accessories can change what looked like a bargain.
S-Video is an alternative only when the player provides that output and the capture device accepts it; audio still needs its own connection. Do not assume a particular VCR has S-Video simply because the capture device does.
An HDMI capture product intended for a modern console or camera is not automatically the right input for an older VHS player. Match the whole connection path, not just the word “capture” on the box.
Make sure these are actually VHS tapes
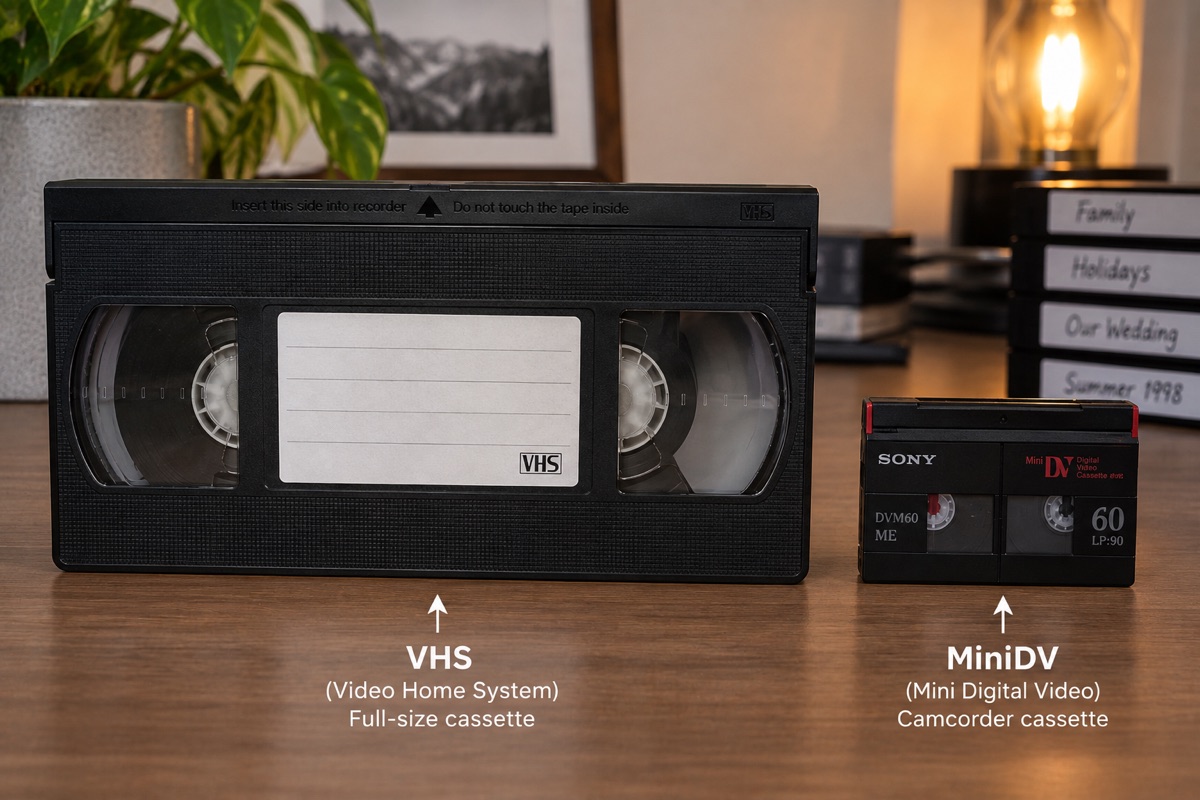
Before building a shopping basket, read the format marking on each cassette. A small camcorder tape may need a completely different player.
Full-size VHS, VHS-C, Video8, Hi8 and MiniDV should not be treated as interchangeable. In particular, the small cassette in this illustration is MiniDV, not a VHS tape that has shrunk. See the tape-identification section in Part 1 before buying a player for a mixed collection.
If you cannot identify a cassette, photograph its markings and ask Porthos Media about your tapes. That is a better starting point than buying an adapter and hoping it fits.
Your first capture: a practical checklist
Set up one short test before committing to an evening of transfers.
- Inspect the tape from the outside. Set aside tapes with mould, broken shells or obvious damage and seek advice before playback.
- Prepare the destination. Check free space, power and the manufacturer's setup instructions.
- Connect the player to the capture input. Confirm the source selection in the software or recorder.
- Capture a short sample. Choose a section with movement and speech so the test checks more than a still title screen.
- Play the saved file. Listen for sound, check lip sync and confirm the picture is not stretched. The preview screen alone is not proof that the saved file is right.
- Capture the tape. Allow the recorded programme to play through; leave time afterwards for checking and organizing.
- Name and back up the result. Use a tape number and a useful description, such as
Tape-04_Family-holiday_1998.
Keep a note of which original produced each file. Our tape inventory template gives you a place to record the labels, condition and progress without guessing unknown dates or running times.
For deteriorated material or a preservation project with specific technical requirements, discuss the collection with a specialist. The Canadian Conservation Institute's VHS digitization guidance explains why playback and capture choices deserve attention.
Common problems to check before buying more equipment
| What you notice | What to check first |
|---|---|
| No picture in the capture preview | Player is playing; connection goes from output to input; correct capture source is selected |
| Picture but no sound | Audio connections and selected audio input; review the saved sample rather than only the preview |
| Faces look unusually wide | Source aspect ratio and capture settings; do not stretch a 4:3 recording to fill a widescreen display |
| Recorder does not recognize storage | Supported storage type and formatting instructions for that exact recorder |
| Saved file stops early | Free space, recorder limits and whether recording stopped before playback finished |
| Tape makes unusual noises or will not move normally | Stop. Do not keep forcing playback of an irreplaceable original |
Work through one change at a time. If the source picture is already unstable, replacing storage or buying a cable labelled “4K” will not establish that the tape and player are healthy.
Before you place the order
Build the total around your collection, not the headline price of an adapter.
- Count the tapes and identify the formats.
- Decide whether you want computer capture or standalone capture.
- Confirm the player, capture device and recording system work together.
- Check the exact seller, model, included cables, power supply and return terms.
- Budget for independent backup storage and the time needed to review the recordings.
- For Amazon.com orders delivered to Canada, review currency, shipping, taxes and any import charges at checkout.
If you only have a few tapes and no working player, compare that complete cost with a VHS transfer service before purchasing a setup. If you enjoy the process and have many tapes, the DIY route may be a project you want to take on. The right choice depends on your equipment, time and the condition of the collection.
VHS-to-digital equipment FAQs
Can a VHS-to-digital converter work without a VCR?
Not by itself. It needs a compatible device to play the cassette. The capture products in this guide receive a signal from a separate player; neither contains a VHS tape mechanism.
Do I need a computer to digitize VHS?
For a USB capture adapter such as Elgato Video Capture, yes. A standalone recorder can capture without one. You still need a plan to check, organize and back up the resulting files.
Should I buy both capture devices?
No. They are alternative capture routes. Choose the workflow you prefer, then buy only the missing pieces for that setup.
Will a more expensive converter turn VHS into HD or 4K?
A larger output file or resolution label does not prove that more original detail was recovered. Playback quality, the source recording and the capture method matter. Preserve a faithful copy before considering any separate enhancement work.
How much storage will each tape need?
It depends on recorded duration and capture settings. Make a short sample with your chosen setup and inspect its file size to estimate your needs, allowing additional space. Do not confuse a cassette's advertised recording capacity with its actual recorded contents.
Is this the best setup for every tape collection?
No. These are approachable consumer options for compatible tapes and equipment. They are not a tested ranking or a universal archival specification. Damaged tapes, unusual recording systems and more demanding preservation goals may need a different workflow.
Prefer to have your tapes transferred for you?
You do not have to become the family's video technician to enjoy the recordings again. Porthos Media can help you discuss the collection, identify the next steps and arrange your project.
For local arrangements, get in touch about drop-off or pick-up. If you are sending your tapes, read how mail-in service works and start a mail-in order before shipping originals.
Still weighing the options? Return to Part 1: converting VHS to digital without owning a VCR.
AROUND THE TABLE
Join the conversation.